Why a migration needs a roadmap at all
Most firms do not decide to "migrate to Revit" in a single meeting. The move happens project by project: one team starts a job in Revit, someone builds a template, details are copied across when deadlines demand it, and after a few years the firm has two half-maintained systems instead of one. The CAD standard still exists, but nobody updates it. The Revit template exists, but it was built for one project type by one person who may have moved on.
A roadmap does not have to be a large document. Its job is to make three things explicit: what you are moving, in what order, and how you will know whether each step worked. When those are written down, the migration stops being a background anxiety and becomes a sequence of small decisions that someone owns.
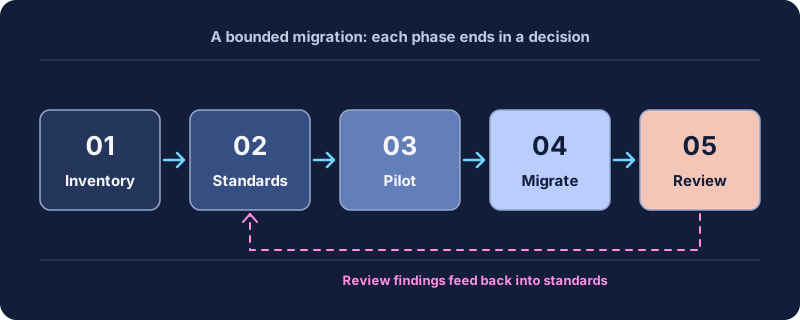
This guide describes a five-phase approach: inventory, standards, pilot, migration and review. The phases overlap in practice, but keeping them distinct helps you avoid the most common mistake, which is converting large amounts of legacy content before you have agreed what "good" looks like in Revit.
Phase 1: Inventory what you actually have
Before deciding what to move, look at what exists. A CAD-based practice usually holds its knowledge in several places at once:
- Standard details in a shared folder, often with several near-duplicates of the same condition.
- Layer standards, either a formal document or an implicit convention inherited from a template drawing.
- Title blocks and sheet setups, including plot styles and pen tables.
- Blocks and symbols for doors, fixtures, annotation and north arrows.
- Project-specific knowledge that never made it into a standard: how a particular client wants drawings, which details were coordinated with which consultant.
You do not need a perfect catalog. You need enough evidence to answer three questions: how much content is there, how much of it is current, and who can say whether a given item is still approved. A simple spreadsheet with columns for item, location, last known use, owner and status is enough. Mark unknowns as unknown. A roadmap built on guessed numbers tends to produce guessed results.
A useful output of this phase is a short list of content that is used on nearly every project. That list is your first migration candidate set. Content used once, years ago, can usually wait or be retired.
Phase 2: Define the Revit standard before converting anything
The most expensive migration mistake is converting content into an undefined target. If line styles, text types and filled region types are not settled, every converted detail carries the CAD habits of its source, and you will clean the same problems again later.
At minimum, agree on:
- Line styles and line weights that represent your firm's graphic hierarchy. Decide how many weights you genuinely need; CAD standards often carry more distinctions than a printed sheet shows.
- Text types for notes, titles and keynotes, with fonts and sizes your firm already prints.
- Filled region types for the materials your details actually show, such as insulation, concrete or masonry.
- Naming conventions for views, families and types, so content is findable later. See the Revit naming conventions guide.
- A mapping from CAD layers to those Revit types, so conversion decisions are made once rather than detail by detail. The layer mapping guide explains how to build one.
These definitions belong in your project template. Keep the first version small. It is easier to add a line style when a real need appears than to remove one that twenty projects already use.
Phase 3: Run a bounded pilot
A pilot tests the standard and the conversion method on real but low-risk content. Choose a small set of details that represent the range you will face: a simple one, a dense one, one with lots of annotation and one with hatching or fills. Use copies in a non-production project, never live project files.
Write the pilot down before you start:
| Field | Example entry |
|---|---|
| Scope | Eight approved wall and roof details, copied to a test project |
| Owner | Standards lead, with one project architect as reviewer |
| Method | Compare redraw against one conversion route for each detail |
| Evidence | Time to an accepted detail, including cleanup and review |
| Effort cap | A fixed number of hours agreed in advance, then review |
| Stop condition | Standard proves unworkable, or results cannot be reviewed |
The numbers in a pilot plan are planning choices, not benchmarks. What matters is that you measure the whole path to an accepted detail. A conversion that runs quickly but requires heavy cleanup has not saved time; a redraw that takes longer but needs no rework might be the better route for some details.
Expect the pilot to change your standard. If three of eight details need a line style you did not define, that is a finding, not a failure. Record it and update the template before the wider migration.
Phase 4: Migrate in batches with clear acceptance criteria
Once the pilot has settled the standard and the method, migrate content in small batches. Each batch should have an owner, a reviewer and acceptance criteria that anyone could apply. Typical criteria for a drafting detail include:
- Uses only line styles, text types and filled region types from the approved template.
- Has no leftover imported CAD geometry or orphaned import line styles.
- Annotation is legible at the intended scale and matches firm text standards.
- Prints correctly on a test sheet at the intended scale.
- Is named and filed according to the library convention.
- Has a recorded reviewer and approval date.
Different details warrant different routes. Some should be linked as reference, some redrawn, some converted. The DWG detail migration strategies guide and the CAD detail triage guide compare the options. Whatever the route, the acceptance criteria stay the same.
Batching also gives you a natural place to pause. If a batch fails review more often than expected, stop and ask why before converting the next one. The cause is usually a gap in the standard or the mapping, not individual carelessness.
Phase 5: Review, retire and feed back
The final phase is the one most often skipped. After each batch, and certainly after the first few months, review three things:
- Is migrated content being used? If teams still reach for the old CAD folder, find out why. It may be a findability problem, a missing detail or a trust problem.
- What did reviewers keep correcting? Repeated corrections point to standard or mapping changes.
- What can be retired? Once a detail exists in the Revit library and has been approved, mark the CAD original as superseded so nobody revives it by accident.
This loop is what turns a one-time project into a maintained library. Without it, the Revit library slowly develops the same duplication and drift the CAD folder had.
Who owns what
Small firms often combine roles, and that is fine as long as decisions have a clear owner. A workable split looks like this:
- Sponsor: a principal or partner who agrees the scope, protects time and accepts the trade-offs.
- Standards lead: owns the template, the mapping and the acceptance criteria.
- Technical reviewer: confirms that a migrated detail still says what the original meant. This must be someone qualified to judge the construction content, not only the graphics.
- Migration contributors: do the conversion or redraw work in batches.
A converted detail that looks right but was never technically reviewed is a liability. Graphics can be checked by a standards lead; technical intent needs a qualified reviewer.
Common pitfalls
- Converting everything at once. Volume hides quality problems until they are expensive to fix.
- Letting the first project define the standard. A template built under deadline pressure for one job rarely suits the next.
- Treating explode as migration. Exploding imported CAD can create many line styles and elements that do not follow your standard. Test it on copies and count the cleanup.
- No retirement path. If old CAD details stay available without a "superseded" label, they will keep being used.
- Measuring only speed. Track the time to an accepted result, not the time to a first draft.
Where tools fit
Tools help most once the standard and mapping exist. A spreadsheet that records layer mappings, a checklist that defines an accepted detail and a written migration process will usually deliver more than any single piece of software, because they make decisions repeatable.
Nova offers draft versions of exactly those planning aids: a mapping workbook, migration playbook and free QA checklist. They are optional; the method in this guide works with your own documents.
For firms that convert many 2D details, an add-in can remove repetitive redraw work once the mapping is settled. Nova Codex is a Revit 2025 add-in for Windows that converts details saved as DXF into native drafting views using an explicit layer mapping to your project's line styles, text types and filled region types. It shows a preview with entity counts and skip diagnostics before creating anything, and supports a defined subset of entities today. Read what Codex converts and what it does not, and treat any tool as one route to test in your pilot, not a substitute for review.
Roadmap checklist
- Inventory of standard content, with owners and unknowns marked.
- First candidate set: content used on most projects.
- Approved line styles, text types, filled region types and naming in the template.
- Written CAD layer to Revit mapping.
- Pilot plan with scope, owner, evidence, effort cap and stop condition.
- Acceptance criteria for migrated content.
- Batch schedule with reviewers.
- Retirement rule for superseded CAD content.
- Review date to revisit the standard.